Procedure for jet pump oil change.
Changing jet pump oil in a Sea Doo should be done every 50 hours of use. Dirty or low oil will cause premature bearing failure (usually at the farthest point from land !). This procedure is fairly simple, requiring no specialized tools. The only part that may get tricky is on certain newer pumps with the new style pusher. The procedure for installing that type cone is coming soon. Lets get started !
Tools needed:
13 mm socket with ratchet and 10" extension (or longest you have)
2 - 10 mm wrench
allen wrench
8 mm socket with ratchet and extension
Needle nose pliers
Sea Doo jet pump oil
Loctite or similar Blue Thread retaining compound
Anti-seize compound
Pan to catch old oil (a pie pan works good)
Removal:
- Remove steering cable at connection to the nozzle, using 10 mm wrenches. If working on a GTS/GTI/GTX, remove 2 large springs (using needle nose pliers) and reverse cable at the connection to the reverse water deflector (you will have to place ski in reverse to remove bolt). If working on a ski with trim, remove trim connections.
- Using 13 mm ratchet, remove 4 bolts attaching nozzle to pump, and remove nozzle, being careful to catch 2 o-rings at the top (newer models don't have these).
- Using allen wrench, remove plug located on top of the center cone.
- Remove 3 8mm cone attachment bolts. Place the pan under cone. Lightly tap the tip of the cone to loosen it. When cone comes off, oil should run out (if no oil present, you have problems!). Check to see that no metallic particles are present in the old oil (use a magnet, if you have one). If any metallic particles are present, service of jet pump will be necessary.
- Grab the shaft (it has 2 flat spots) and try to move up and down. If there is any movement greater than .05 mm, the jet pump should be rebuilt.
- Check the o-ring located on the cone for any flat spots or tears. If it appears loose or damaged, replace with a new one.
- Using paper towels or a rag, wipe off old oil from shaft and inside of cone. Also make sure no oil remains on cone and jet pump mating surfaces. If available, use a solvent to clean these surfaces.
- Apply a light coating of Loctite 518 sealer to the o-ring and install it in the groove of the cone. Next, apply Loctite 518 sealer to the pump at the mating surface of the cone.
- If your pump utilizes a pusher, there are several styles and you’ll need to reinstall pusher parts into cone properly then install cone carefully to insure that pusher is working properly.
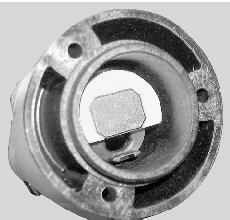
On the newer style cones that utilize a 3 piece pusher (see picture below), you’ll need to insert a pencil or plastic pin into the oil fill to depress the tab and release pressure on the pusher. Then install cone and remove pencil. On this type system, after installing the cone bolts, you need to make sure the pump turns freely. You can do this by removing the grey PTO (engine flywheel) cover and rotate the engine by hand. If the pump feels tight, you may have to remove the cone and repeat installation procedure.
- Replace cone onto jet pump, making sure fill opening is on top and making sure that o-ring remains in cone groove. Apply Blue thread locking compound to threads of cone bolts and install. Torque 5mm bolts to 7 N m (62 lb in) for aluminum 140 pump cone, 4 N M (35 lb in) for plastic 140 pump cone. Torque 6mm bolts to 4 N m (35 lb in) for 155 pump cone
- Add oil to fill opening until it reaches top. Lightly tap the sides of the cone to release any air (you may also wait a few minutes for excess air to come out). Repeat until oil is level with lower threads at fill opening and no more air escapes.
- Apply anti-seize to the fill plug on aluminum/bronze cones and pipe sealant on plastic cones and install stainless plug.
- Apply anti-seize to the 4 13mm bolts. If your model had the 2 o-rings, you need to stick them to the nozzle. This is accomplished using some grease. Apply grease to the o-rings, and place them in the 2 pockets on the top of the nozzle. Carefully install nozzle, and torque 4 bolts to 25 N m (18 lb ft) for aluminum pump, 21 N m (16 lb ft) for plastic pump.
- Attach cables, springs, and connections in the reverse order that they were removed.