|
|
|
Parts Inventories from overstocked or closing Sea Doo shops. If you have parts or know of a Sea Doo dealer in your area that is closing, contact me at OSDparts.com with the details.
ALSO WANTED |
|
|
|
OSDparts Items
 Complete Carb Rebuild Kits For Sea Doo Hard to read? 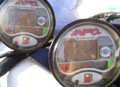 Check out this Gauge repair kit! 1995-up Sea Doo? 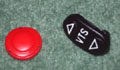 NEW Button Kit Is now available!  Fits Most 2 Stroke Carb Sea Doos 1995-1997 Sportster MPEM Conversion 1995 Speedster MPEM Conversion 1996 Speedster MPEM Conversion 1997 Speedster MPEM Conversion 1997 Challenger MPEM Conversion
Complete Pump Housing Kits! |
|
New Parts (OSD)
Accessories & More
|
|
Technical Info
787/947 CB Reservoir Oil
|
|
Sea Doo Tips
electrical system damage NEVER jump start your ski with a running vehicle!!
Change your pump oil
Battery dying in your Trim
Every time you have
Save money and time
|
| The area above is always changing so check back often as links are added. |

Thru-Hull Type VTS Module Test ProcedureThe following procedures test the Thru-Hull VTS Unit that incorporates the motor and is found on most all 1995-2004 models that had electric trim. Due to the metal clamps they put on the vts boot, a common problem is the boot failing and allowing water into the module. Before testing the wiring, pull the cover off the vts to insure there isn’t moisture/corrosion in the box. Also, before testing make sure the VTS 7.5A fuse (in MPEM or Coil Box) is ok. If you get a “click” but no up/down, that’s usually a blown 7.5A VTS fuse and you would need to know why it blew. I’ve found the procedures below handy in troubleshooting various VTS problems.
Also, if you find your VTS boot is leaking or even if it isn’t and you still have the old gear clamps, I sell a Boot Update Kit that will fix any future leakage problems.
VTS Module Test This is a test for the wires going INTO the VTS module. Note the trim unit does not have to be removed from the boat for these tests. To perform the tests, you’ll need to disconnect all cables going to the VTS and follow the procedures below.
Always refer to the oem service manual if you’re not sure of a procedure. Finally, if you find your module or motor is bad, let me know since I may have a new or used one available!
|