|
|
|
Parts Inventories from overstocked or closing Sea Doo shops. If you have parts or know of a Sea Doo dealer in your area that is closing, contact me at OSDparts.com with the details.
ALSO WANTED |
|
|
|
OSDparts Items
 Complete Carb Rebuild Kits For Sea Doo Hard to read? 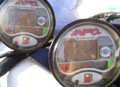 Check out this Gauge repair kit! 1995-up Sea Doo? 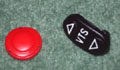 NEW Button Kit Is now available!  Fits Most 2 Stroke Carb Sea Doos 1995-1997 Sportster MPEM Conversion 1995 Speedster MPEM Conversion 1996 Speedster MPEM Conversion 1997 Speedster MPEM Conversion 1997 Challenger MPEM Conversion
Complete Pump Housing Kits! |
|
New Parts (OSD)
Accessories & More
|
|
Technical Info
787/947 CB Reservoir Oil
|
|
Sea Doo Tips
electrical system damage NEVER jump start your ski with a running vehicle!!
Change your pump oil
Battery dying in your Trim
Every time you have
Save money and time
|
| The area above is always changing so check back often as links are added. |

Getting a Water Flooded 2 Stroke Running
After being around Sea Doo PWCs and rental businesses for years, I've seen many flooded 2 strokes!
|